| Prev page | Table of contents | Next page |
| Home | ||
|
|
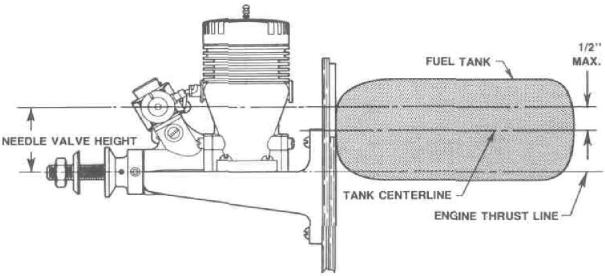
| Proper fuel tank height is particularly important in aerobatic airplanes because if the tank is too high or too low, the engine may not run the same when the airplane flies inverted. For side mounted engine installations, the needle valve height at the carburetor is zero — it is effectively on the engine thrust line when viewed from the side. |
DOUBLE-VENT: Models which have the engine completely cowled in, or where the fuel feed line is hard to get at, will need to have three brass tubes installed through the rubber stopper - one for fuel feed to the carb, one for an overflow vent, and one for a filling vent (see photo). The brass tube that goes to the top of the tank is the overflow vent, the brass tube that goes to the bottom of the tank is the filling vent. Pump the fuel into the filling vent until it runs out of the overflow vent. Then plug the filling vent hose with a short bolt to keep the fuel from siphoning out of the tank, and you are ready to fly.
CHECK FOR LEAKS: After assembly of the tank, check it for leaks before installing it in the model. Plug all but one of the tank lines, then pressurize the tank by forcing air into the remaining line (with a fuel bulb, fueling syringe, empty squirt bottle, or your lungs) while holding the tank under water and watching for air bubbles. If you see any bubbles, correct the problem before proceeding. A leaky fuel tank will not work!
TANK INSTALLATION
You need to plan for your fuel tank installation during construction of the model. The tank can be mounted with the stopper assembly poking completely through a 1" diameter hole in the firewall, or it can be installed with the stopper behind the firewall with only the fuel lines going through smaller holes in the firewall. Plan ahead so you can drill or cut the necessary holes in the firewall before you glue it in the fuselage.
FUEL TANK LOCATION: A lot of engine problems can be traced back to improper fuel tank location. Model engines draw fuel by suction created as the intake air flows through the venturi in the carburetor. If the tank is mounted too low, too high, or too far back, the engine may not be able to draw fuel during the entire flight. The basic rule of thumb is to mount the tank so that when the plane is level, the centerline of the fuel tank is at the same height or slightly lower (no more than 1/2") than the high-speed needle valve on the engine. You should also keep the tank as close to the back of the engine as possible so the fuel lines can be kept short.
FUEL TANK MOUNTING: Modern plastic fuel tanks are virtually indestructible under normal use - bursting or cracking is very rare - so it is quite practical to mount the tank semi-permanently once the model is finished. Make scrap balsa supports for the bottom and back of the tank to hold it in place. Glue the supports to the fuselage sides. Seal around any holes in the firewall where the fuel lines come through with silicone rubber sealer to prevent exhaust oil from leaking inside the fuselage. Should the need ever arise to remove the tank for servicing, simply break away the balsa supports and silicone, and the tank can be taken out.
Some modelers prefer to wrap their fuel tank in foam rubber to help isolate it from engine vibration. While this is not always possible in some tight fitting installations, if you do have enough room inside the model it can provide additional insurance against fuel foaming. After getting the tank positioned correctly, more foam rubber can be stuffed around the tank to hold it in place.
FUEL LINE TIPS: There are several types of flexible rubber fuel line tubing available, but by far the most popular type is the kind made with silicone, like Sig's Heat-Proof Silicone Fuel Tubing. This fuel line tubing will not melt even if it is touching the hottest part of the engine. Also, it will not harden or deteriorate in raw fuel. Before using any fuel line, check it over carefully for pin holes or cracks. Any flaws in the line will be easy to see by stretching it while you look. When installing a fuel line, it is very important that it is not kinked and that it's not touching any sharp edges. Connect the feed line to the engine's carburetor, cutting it to its minimum length without stretching it. Route the vent line, or lines, out the bottom of the engine compartment. Make sure that fuel won't be sprayed on the model when the tank is filled and overflows out of the vent line.
|
|
|
HOOKING UP MUFFLER PRESSURE TO THE TANK: If your engine's muffler is equipped with a pressure tap, you can utilize it to pressurize the fuel tank to provide a more uniform fuel flow to the carburetor. The hookup for pressure is shown in the picture. Simply connect the pressure tap to the open vent line (the overflow vent in a double-vent set-up) of the tank with a piece of fuel line tubing. This makes the entire fuel system closed, with none of the lines open to the atmosphere. Air pressure that is being bled off the muffler will now pressurize the tank and force feed fuel to the carburetor, instead of relying totally on the suction of the engine. During refueling, remove the line from the pressure tap so that you don't fill the muffler with fuel when the tank gets full. Do not try to fill the tank in reverse from the pressure line, the tank will not fill properly and fuel may be forced into the engine. One other important note - although muffler pressure helps improve the fuel flow, don't count on it to cure problems created by locating the fuel tank in the wrong place! |

|
|
| Prev page | Table of contents | Next page |
| Home | ||


